How To: Using Cloudflare with WordPress


In an effort to make this blog load fast everywhere in the world and not just in Europe where the server happens to be located, I decided give Cloudflare a try, since they offer a free service in addition to their premium offerings. There are however some not quite so obvious steps to consider when starting to use a full-site CDN, especially when using WordPress as the site engine.
Prepare your WordPress site
The very first step is to disable the admin bar for your entire site, or you will run the risk of it being visible to your normal website visitors, since Cloudflare will cache the first visit to a particular page, regardless who the visitor happens to be.
Disabling the admin bar can be done from your WordPress profile. I do however prefer to use the “treat logged in users as anonymous” feature in WP Super Cache, since it is the most foolproof way of not letting anything slip through the cracks.
While setting up anonymous users in WP Super Cache, take the time to enable caching there as well. This will add another layer of protection if your site is hit with lots of traffic which Cloudflare hasn’t cached yet for some reason.
Cloudflare plugins
There are two plugins I recommend using, and the first one is the official Cloudflare plugin, which makes sure that you see the correct IP addresses of the visitors, as well as having an integration with comments marked as spam being filtered by Cloudflare directly.
The second plugins is Cloudflare cache purge, which is used to control and expire the Cloudflare cache for certain URLs when posting new content to the site.
Create a Cloudflare account
Signing up for Cloudflare requires a bit of an effort, since you will have to modify your domain to use the Cloudflare DNS servers. While being straightforward, it may take some time depending on your registrar. Take serious note to carefully verify that all your subdomains are listed when setting up DNS, since they will stop resolving if you do not explicitly add them.
Once the DNS service has been enabled, you are ready to enable caching of your WordPress site. There are however lots of other security and performance settings that can be tweaked, but since those may vary depending on the site and content, I will skip right to the caching rules for now.
Set up caching rules
Cloudflare ships with three rules available in the free version, which is fortunately just enough to cache WordPress properly. In these examples, I am using this very blog as a template for the URLs and you naturally need to modify these to suit your site.
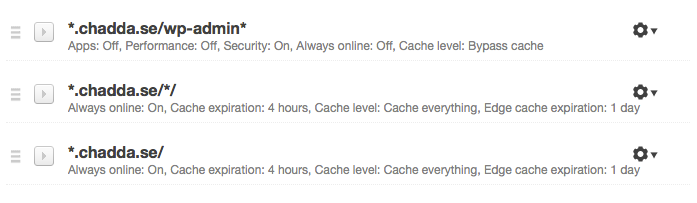
Rule one is for disabling caching for all admin pages. The second rule enables caching for all URLs ending in slash, which means that there is a requirement to enable permalink settings for this to work. The final rule is to enable caching on the front page as well, since the second rule does not include this.
Making sure it works
To verify that Cloudflare is doing its job, we have to inspect the HTTP headers. The easiest way is to open the Terminal and use the curl command:
?  ~  curl -I http://johnny.chadda.se/
HTTP/1.1 200 OK
Date: Tue, 28 Oct 2014 22:18:15 GMT
Content-Type: text/html
Connection: keep-alive
Set-Cookie: __cfduid=12345678910111213141516171819; expires=Mon, 23-Dec-2019 23:50:00 GMT; path=/; domain=.chadda.se; HttpOnly
Last-Modified: Tue, 28 Oct 2014 20:43:23 GMT
Vary: Accept-Encoding
CF-Cache-Status: HIT
Expires: Wed, 29 Oct 2014 02:18:15 GMT
Cache-Control: public, max-age=14400
Server: cloudflare-nginx
CF-RAY: 180a8216d4780a45-AR
The interesting part is the CF-Cache-Status: HIT part, which says that the request has hit the Cloudflare cache and will not be fetched from your origin server. If you don’t see the message, this is either the first request to that specific page, and simply rerunning the command will show that the request has now been cached. If not, revisit the section on caching rules, since something wonky is probably going on.